

In a major digital convenience boost for Indian users, Google Wallet has introduced a powerful new feature — the ability to add your Aadhaar card directly to the app. This update comes through a collaboration with the Unique Identification Authority of India, making identity verification simpler, faster, and more secure.

Launched in India in May 2024, Google Wallet already allowed users to store boarding passes, tickets, and ID cards. With this latest upgrade, it takes a big leap toward becoming a complete digital identity hub.
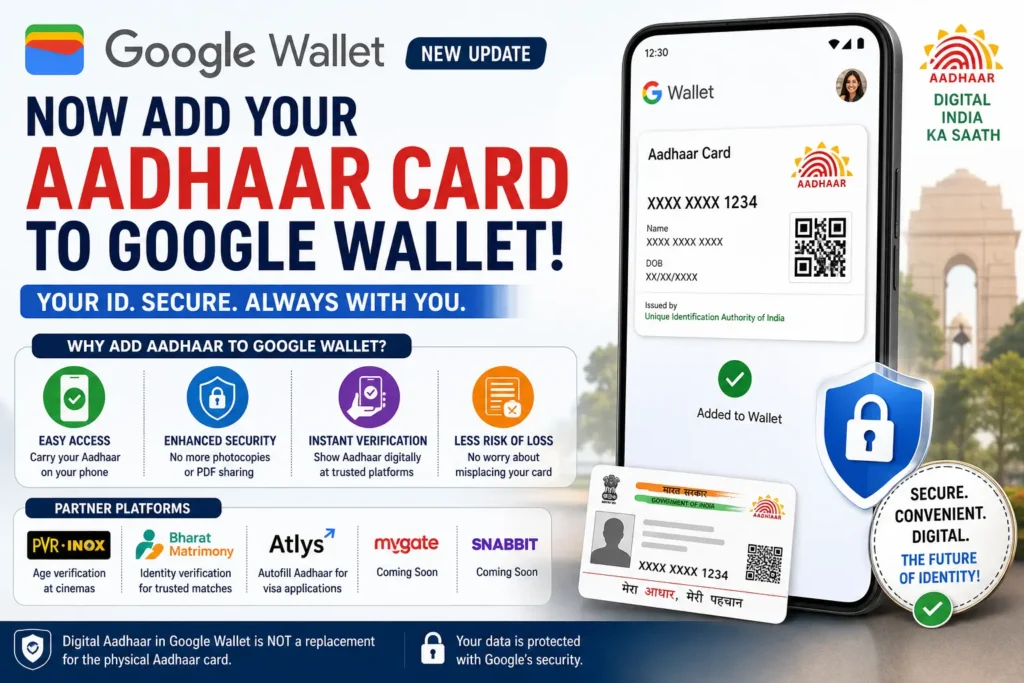
What’s New in Google Wallet Aadhaar Feature?
With this update, Android users can now securely store a digital version of their Aadhaar card on Google Wallet. This means:
- No need to carry a physical Aadhaar card everywhere
- Instant access to your ID anytime via smartphone
- Safer alternative to sharing Aadhaar PDFs
However, Google clearly states that this digital Aadhaar does not replace the physical card, but acts as a convenient backup.
Key Benefits of Adding Aadhaar to Google Wallet
1. Easy Access Anytime
Even if you forget your Aadhaar card, you can simply show the digital version on your phone.
2. Enhanced Security
Avoid sharing Aadhaar photocopies or PDFs, reducing risks of identity theft.
3. Seamless Verification
Google has partnered with platforms like:
- PVR Inox – for age verification at cinemas
- BharatMatrimony – for identity verification
- Atlys – for autofill during visa processes
Upcoming integrations include:
- Mygate
- Snabbit
4. Reduced Risk of Loss
No more worry about losing your physical Aadhaar card.
How to Add Aadhaar Card to Google Wallet (Step-by-Step)
Method 1: Using Aadhaar App
- Download the Aadhaar app from Google Play Store
- Open the app and log in using your Aadhaar number
- Verify via OTP sent to your registered mobile number
- Tap on “Add to Wallet”
- Select Google Wallet
- Tap Continue
- Follow on-screen instructions to complete the process
Method 2: Using Google Wallet App
- Download and open Google Wallet
- Tap the “+” (Add) button
- Select Aadhaar option
- You’ll be redirected to the Aadhaar app
- Complete verification and follow instructions
- Aadhaar will be added to your wallet
Important Things to Keep in Mind
- Digital Aadhaar is not a legal replacement for the physical card
- Requires your Aadhaar-linked mobile number for OTP verification
- Works only on Android devices (currently)
- Internet connection is needed during setup
FAQs
Q1. Is digital Aadhaar in Google Wallet valid everywhere?
No. It is useful for convenience and verification in supported platforms, but not a replacement for the physical Aadhaar card.
Q2. Is it safe to store Aadhaar in Google Wallet?
Yes, Google uses advanced security measures, and it reduces risks associated with sharing physical copies or PDFs.
Q3. Can iPhone users use this feature?
Currently, this feature is available only for Android users.
Q4. Do I need the Aadhaar app to add it to Google Wallet?
Yes, Aadhaar verification is required through the official Aadhaar app.
Q5. What if I change my phone?
You will need to re-add your Aadhaar on the new device.
Q6. Is internet required every time to access Aadhaar?
No, once added, you can view it offline, but initial setup requires internet.
Q7. Can I use it for government verification?
In most official cases, physical Aadhaar may still be required.